What are Mini-Mobilities?
In ALL GAIN, NO PAIN (You can get All Gain, No Pain for free at the end of the blog), I explain that Mini-Mobilities are brief, simple activities that emphasize parts of the body that can get a little achy, sore, or tight from increased intensity. By frequently moving these areas, you can reduce pain and muscle tension to accelerate gains in movement and comfort.
Regaining and reinforcing comfortable movement is more about learning or relearning how we move. Performing your mini-mobilities several times a day provides repetition of good movement and awareness that our brain values in just a few seconds at a time. They also break the cycle of inactivity that can reinforce restricted movement associated with prolonged sitting or standing and work or rest environments that may increase physical loads and drain your stress bucket.
Just about any movement can be considered as a Mini-Mobility, but we can be much more targeted with our efforts for a bigger return on investment.
How do I determine which Mini-Mobilities I need?
It’s really quite simple.
In Chapter 8 of ALL GAIN, NO PAIN, you’ll find a process of self-assessment to determine your own personal movement challenges where you may feel restricted or limited.
For some, it may be a breathing-related challenge. For others, perhaps a limitation in hip or shoulder movement. Once you determine your specific needs, it’s then just a matter of how best to address your challenges by performing an activity that targets it.
There is a trick to enhancing the benefit of any Mini-Mobility activity and that is to start with a Reset explained in Chapter 10. In many cases, performing a level appropriate Reset (you can find these listed in Appendix 3) can “shut off” undesired muscle tension and free up movement that may appear to be limited from your movement assessment. In this case, I suggest that your reset exercise becomes your Mini-Mobility activity.
Follow your quick reset with an activity that targets your problem area. A simple way to attack your challenge can be simply performing the limited movement assessment for repetitions as if it was an exercise. For example, if I’m sitting in a meeting and it’s time to do my Mini-Mobility, I can knock out a series of Seated Hip Shifts (Chapter 8) and no one is the wiser that I just got in my “mobility session” without having to interrupt the meeting. If you have a couple of minutes to yourself, select one of your favorite Readiness activities that target your challenged movements.
When do I do them?
The key to restoring your movement capabilities is consistency.
Rarely does effortful or painful pulling, yanking, and hard stretching make an impact over the long term as your body may actually “tighten up” against the discomfort. Lightly approach your end ranges of movement but never force muscles and joints to length. Over time, you’ll notice increasing gradual improvements in your ability to access more comfortable movement.
How often you may need to perform your Mini-Mobilities depends on your individual needs. The more sedentary your job or the more limited you appear to be from your movement assessment, the more frequently you should perform your sessions. In the past, I’ve done a quick mobility exercise almost every hour of the workday if I’ve been dealing with a real problem area. This may seem like a lot but since it requires only a couple minutes, it makes a great break from sitting, or in my case, it fits perfectly between patient treatments or client training sessions.
A simple strategy to assure your Mini-Mobilities are completed is to schedule them. My OURA Ring has a reminder on it to let me know that I’ve been sitting too long, and it’s time to get up and knock out a set. Set an alarm on your smartphone or on your email or daily calendar if you spend a lot of time on a computer.
The key is consistency. Get it done.
A Day of Mini-Mobilities
Here is my Mini-Mobility Schedule for today
7 am: Resets + Lazy twister
9am: Resets + Readiness + Workout
12pm: Lazy Twister
3pm: Lazy Twister
6pm: Lazy Twister
9pm: Night time ritual/Resets + Lazy Twister
What if everything is limited?
Sometimes it may seem that everything is limited, and you just don’t know where to start. If that’s the case, focus on Level 1 resets as your initial strategy.
When you have a lot of apparent movement limitations, Level 1 resets are more supportive and help reduce a great deal of muscle tone in the upper back, trunk, and hips that impacts your overall movement. Once you’ve done this, then pick one or two Readiness exercises and stick with those activities until you make the desired progress based on your assessment tests.
It’s is best to focus your efforts on a limited number of movement challenges and make great progress versus trying to do it all at once and dilute your efforts (unless of course you exercise for a living).
How to do Lazy Twister from ALL GAIN, NO PAIN
Set-up
![]()
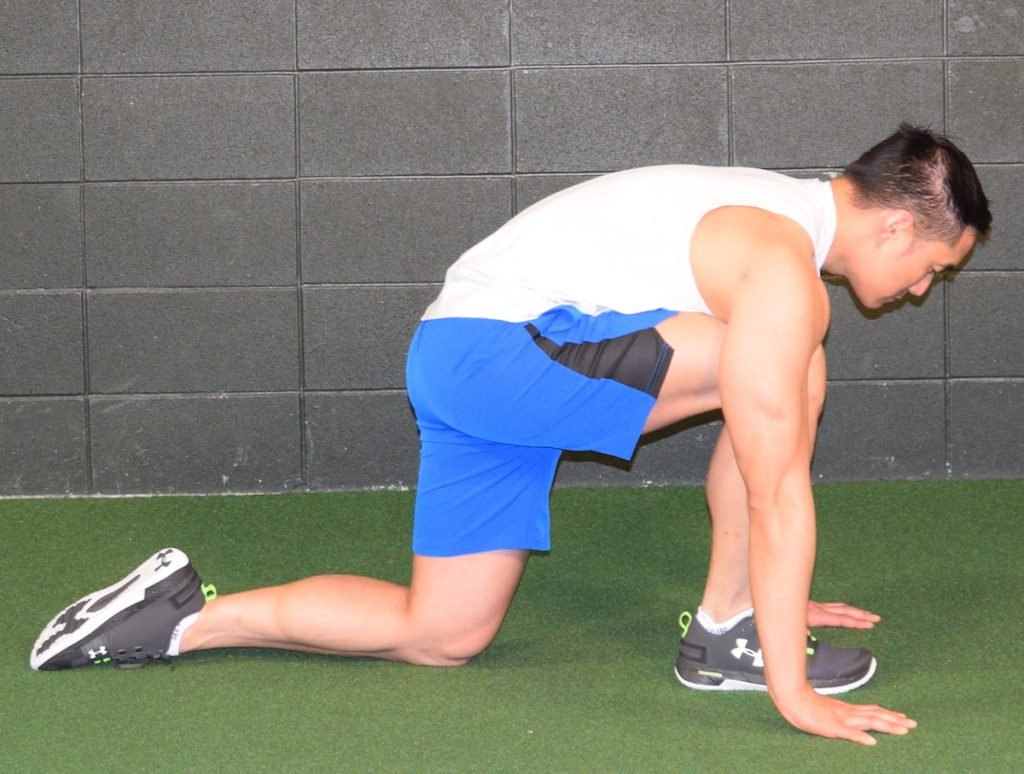
- Position yourself on all fours on the floor
- Hands should be directly below the shoulders and knees directly below the hips
Head should rest in line with the ear, shoulders, and hips
Performance
- Push long through the arms as if to push away from the floor
- Bring your right knee forward to bring the right foot to rest next to your right hand
- Turn your shoulders to the right and reach to the ceiling with your right hand
- Perform one full breath in through the nose and out through the mouth
- Return to the starting position
- Repeat on the other side
- Perform 5-10 repetitions on each side
Coaching Cues
- Keep your spine “long”
- Push away from the floor with your arm
- Adapt the position of your foot to your personal level of flexibility and do not force into pain
0 Comments
Join the conversation